Provisioning Azure resources with Terraform - Part 2 - Backends
Intro
In the first article about Terraform I have focused on basics required to start working with the tool. Today I would like to tell you about feature called backends which is essentially way of storing state file.
Local backend
By default Terraform is using local backend which is simply writing state file to local file system. This provider does not require providing any additional configuration and by default will use terraform.tfstate file to store your state. For the sake of learning, lets try to change the name of the file used for storing the state. Add following block to main.tf file which we have created in previous article.
terraform {
  backend "local" {
    path = "my-state-file.tfstate"
  }
}
The above code instructs Terraform to configure local backend in such way that it stores state file in my-state-file.tfstate. Now if you would try running terraform plan you would get information about need of running terraform init first to initialize the backend. In fact it needs to be called after all backend configuration changes.
If you have not done it yet - run terraform init now. You should see information as on screenshot below.

As you can see, Terraform detected that configuration of local backend was changed (name of the state file was set to my-state-file.tfstate) and we need to make a decision whether we would like to copy state from previously used terrafrom.tfstate to new my-state-file.tfstate. We will opt for doing that by choosing “yes”. This option will also be available in more advanced scenarios - e.g. when migrating from local to remote state - I will show you that later on.
Now that we have discussed basic configuration of the local backend and how to initialize it, lets talk about feature which is called state locking.
Locking
State locking is a feature exposed by some of the backends. When running command which is modifying the state (apply, destroy), Terraform locks the state file. The lock is held until command finishes its execution - during that time, no other Terraform process can modify the state file. State locking is essentially way of ensuring consistency of the state file.
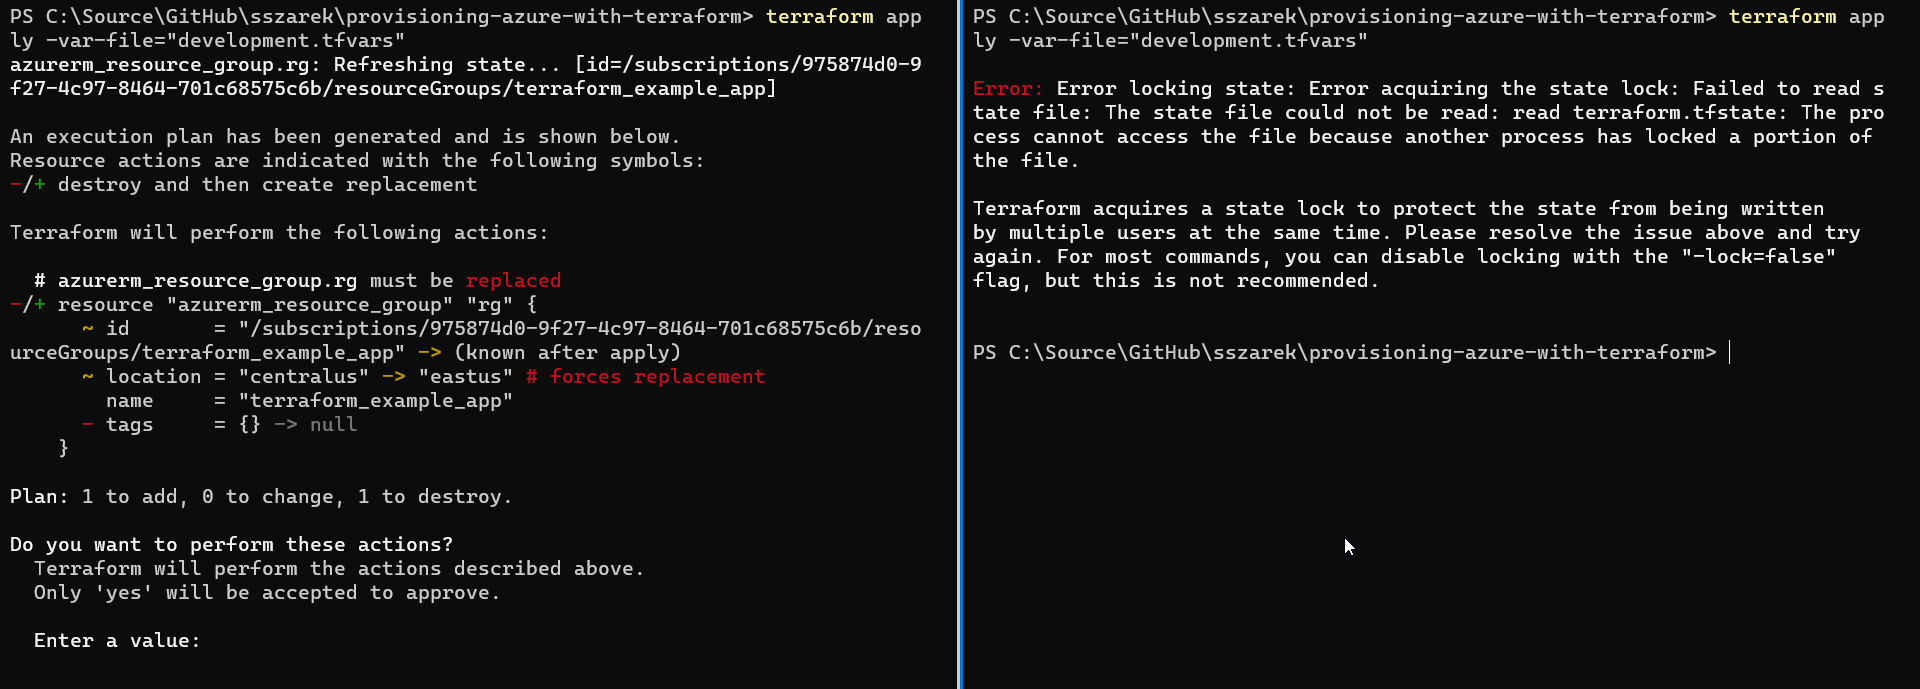
Lets see how it works in practice. Lets open two console windows and navigate to directory with Terraform scripts we have created in the previous post. When done, run terraform apply command in both of them but do not confirm. You should get output similar to one on the screenshot below.

On the left side there is normal output from the command which includes execution plan and prompt for confirming applying infrastructure changes. On the right side however there is an error. The error message informs that Terraform was unable to acquire the lock as there was another Terraform process which already locked the file.
If you take closer look at directory with your scripts you will notice that there is new file created: .my-state-file.tfstate.lock.info. It was created by Terraform when acquiring a lock - when another process which is attempting to modify the state will see this file exists it will stop with the same error as one the right side of the screenshot.
While the above example was showing how state locking is working, local backend can be hardly used in scenarios where team of people need to colaborate. There reason for that is simple and lies in the name of the backend - local. Imagine two developers making separate changes in Terraform scripts and running terraform apply against the environment. In such scenario there is no way that Terraform could detect two separate changes being done - as a result the state files on both developer machines would contain distinct changes and get out of sync.
In the next section I will talk about remote backends using azurerm as an example.
Remote backend
Unlike local backends, remote ones allow sharing the state across several parties - in order to make this happen, such backend need to store the state in some shared location. Different implementations are using different solutions to achieve that goal e.g.:
- http backend - relies on HTTP API to retrieve, lock and update the state.
- s3 backend - which uses Amazon Simple Storage Service in order to store the state and DynamoDB to allow state locking.
The implementation I will talk about in this section is azurerm - it is using Azure Blob Container to store the state and its built in capabilities to provide locking.
In order to configure the backend we will need separate Storage Account for storing the state - we will create one along with new Resource Group using Azure CLI. You might probably wonder why I am not telling to create that with Terraform. You could but then you would need to store the state somewhere. It is more practical to create set of scripts which bootstraps resources required to store the state and the build outstanding infrastructure with Terraform.
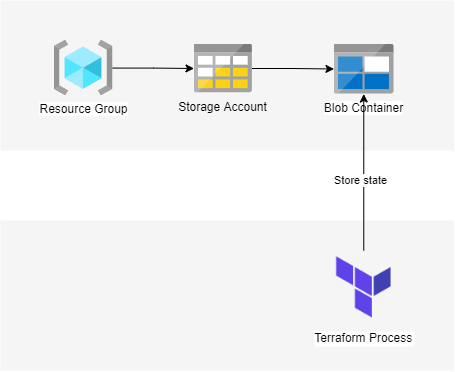
For configuring azurerm backend we will need to create following Azure resources:
- Resource Group - it will contain resources needed for storing Terraform state. Usually you will want to have separate Resource Groups for the resources used by system you are creating and the supporting infrastructure.
- Storage Account - will contain Blob Container.
- Blob Container - actual state will be stored as blob.
Essentially we are looking for the setup as on diagram below.

Lets start from creating Resource Group:
az group create --location centralus --name terraform-state-storage
Now we can create Storage Account - while creating it, we need to make sure that its name is globally unique and has no more than 24 characters. We can achieve that with simple trick: generate GUID/UUID and then hash it with MD5 algorithm. In Linux environments it is as easy as running:
uuidgen | md5sum | head -c24
In Windows environments running PowerShell you can achieve that following this example.
Lets use generated name to finally create Storage Account.
az storage account create --name <your unique storage account name> -- resource-group terraform-state-storage --location centralus --sku Standard_LRS
One missing bit right now is Blob container, we will create it running command below:
az storage container create --name statecontainer --account-name <your unique storage account name>
With all the above resources set up, lets jump into configuration of azurerm backend. We will modify main.tf file by replacing previously added configuration for local backend with following block:
terraform {
  backend "azurerm" {
    resource_group_name  = "terraform-state-storage"
    storage_account_name = "<your unique storage account name>"
    container_name       = "statecontainer"
    key                  = "my-state-file.tfstate"
  }
}
As you can see on the snippet above we need to provide values for three arguments:
resource_group_name- name of the resource group where storage account is locatedstorage_account_name- name of the Storage Account which contains Blob Container for storing the statecontainer_name- name of the state file which will be saved in the blob
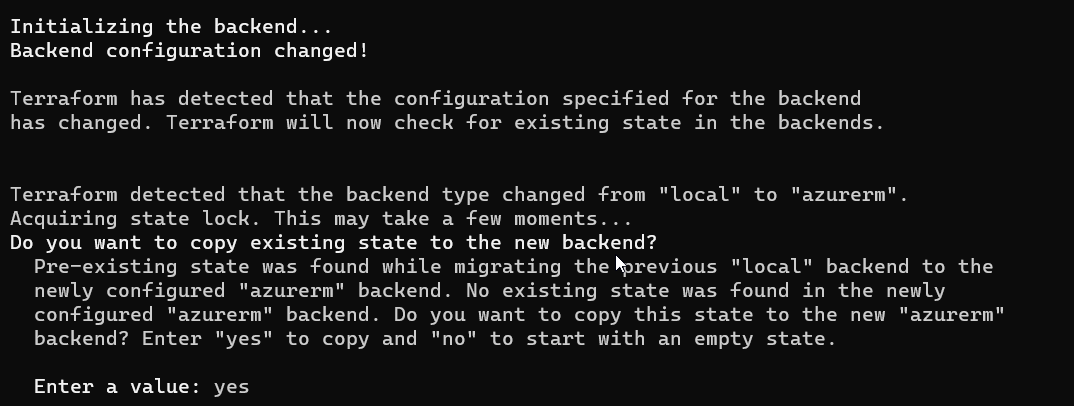
When you are done changing backend configuration, run terraform init to initialize new backend. You should see information similar to one which you have already seen when we were reconfiguring local backend - Terraform will ask if you would like to copy existing (local) state to the new backend. You can confirm by typing yes. Typing no would cause initializing empty state in remote backend.

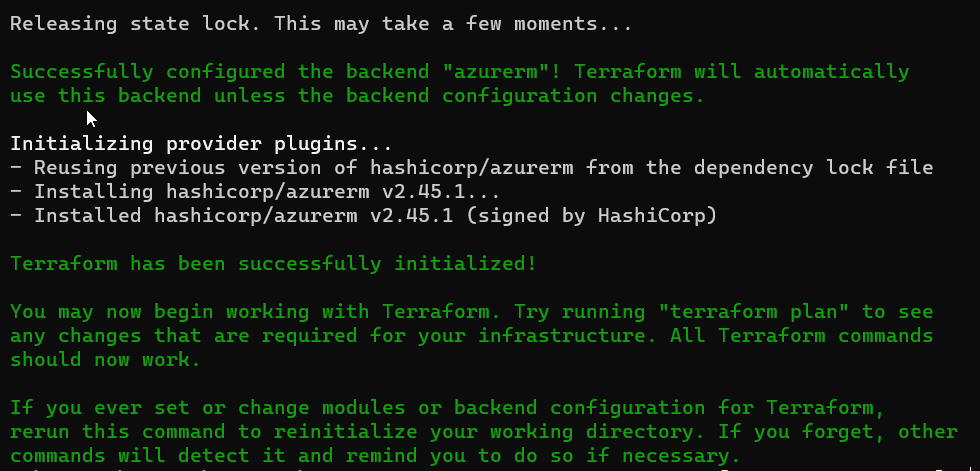
We will choose the first option and type yes. Now Terraform should display information that the backend was switch, similar to one one the screenshot below.

Right now if you inspect the contents of the Blob you will see new file being available, which is my-state-file.tfstate. Below command will list files available in Blob Container and format the output as a table.
az storage blob list `
 --container-name statecontainer `
 --account-name <your unique storage account name> `
 --query "[].{Name:name, ContentType:properties.contentSettings.contentType,CreationTime:properties.creationTime}" `
 --output table
The output of the above should be similar to the screenshot below:

If you would inspect my-state-file.tfstate file in Container you would found out that this has the same structure and contents as its local counterpart. By the way, local version of the file should still be available in the directory but be aware of the fact that Terraform will ignore its contents as right now its configured to work with remote backend.
You can also inspect contents of the Container by navigating to your Storage Account in Azure Portal and using Storage Explorer.
Summary
After lecture of this article you should understand the capabilities and basics of Terraform backends. The topic is broad and I strongly encourage you to experiment and go through official documentation.
In the next article I will continue talking about remote backends but this time I will focus on state conflict resolution. Stay tuned! 😎